Wednesday, November 30, 2011

Lesson 33: Internet and Web Applications Part1-The web Browser

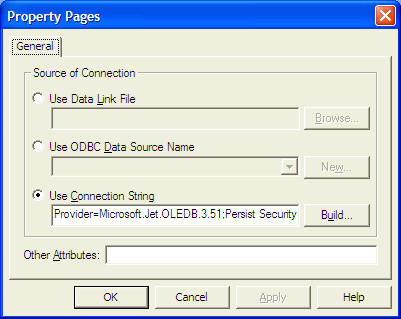
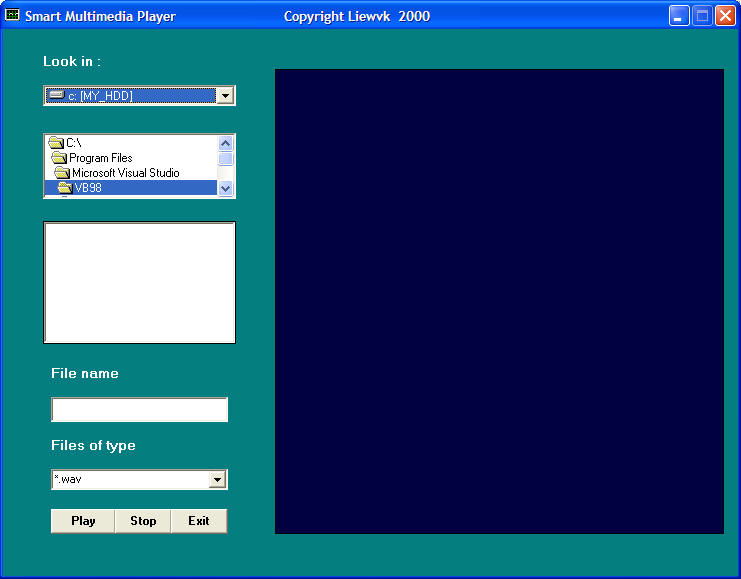
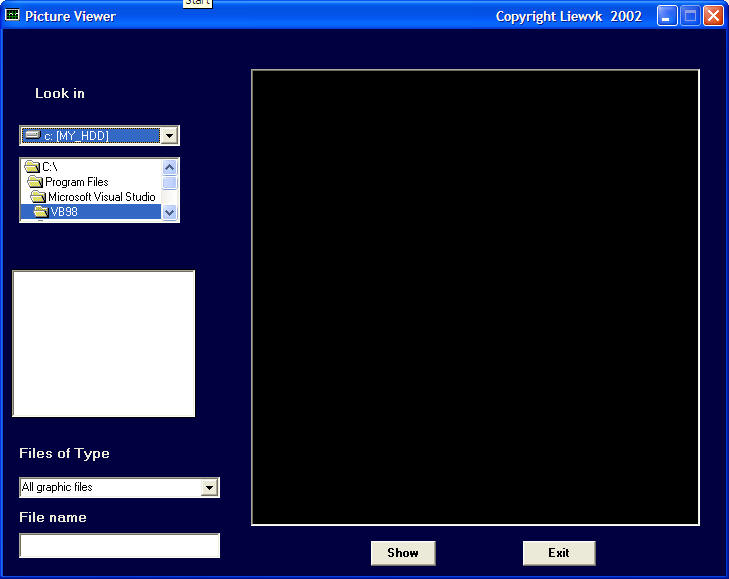
In order to create the web browser, you have to press Ctrl+T to open up the components window and select Microsoft Internet Control. After you have selected the control, you will see the control appear in the toolbox as a small globe. To insert the Microsoft Internet Control into the form, just drag the globe into the form and a white rectangle will appears in the form. You can resize this control as you wish. This control is given the default name WebBrowser1
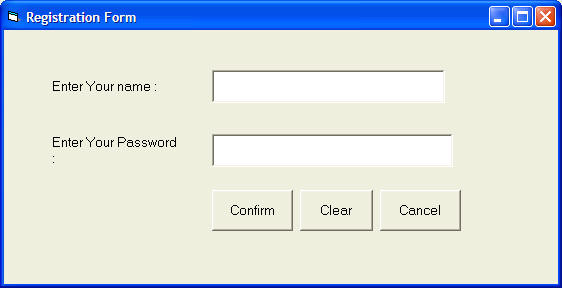
To design the interface, you need to insert one combo box which will be used to display the URLs. In addition, you need to insert a few images which will function as command buttons for the user to navigate the Internet; they are the Go command, the Back command, the Forward command, the Refresh command and the Home command. You can actually put in the command buttons instead of the images, but using images will definitely improve the look of the browser.
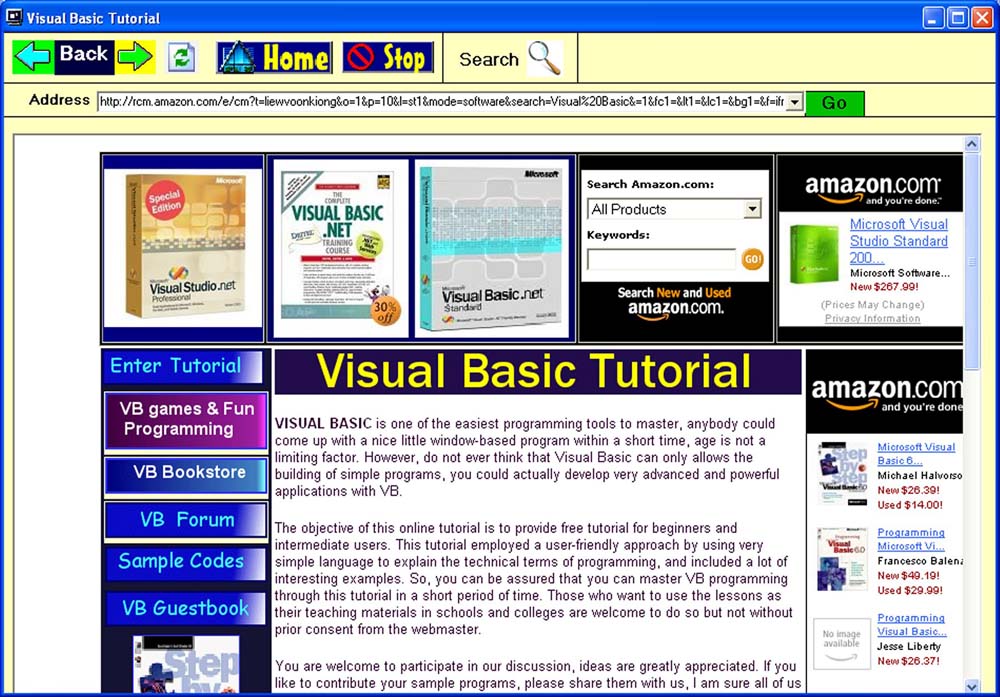
The procedures for all the commands are relatively easy to write. There are many methods, events, and properties associated with the web browser but you need to know just a few of them to come up with a functional Internet browser  
 
 
The method navigate is to go the website specified by its Uniform Resource Locator(URL). The syntax is WebBrowser1.Navigate (“URL”). In this program, I want to load the www.vbtutor.net web page at start-up, so I type in its URL.  
Private Sub Form_Load()
 
WebBrowser1.Navigate ("http://www.vbtutor.net")
 
End Sub
 In order to show the URL in the combo box and also to display the page title at the form caption after the page is completely downloaded, I use the following statements:
Private Sub
 
 WebBrowser1_DocumentComplete (ByVal pDisp As Object, URL As Variant)
Combo1.Text = URL
Form1.Caption = WebBrowser1.LocationName
Combo1.AddItem URL
 
End Sub
The following procedure will tell the user to wait while the page is loading.
Private Sub
 
WebBrowser1_DownloadBegin ()
Combo1.Text = "Page loading, please wait"
 
End Sub


http://www.vbtutor.net/vb6/vbtutor.html
»»  READMORE...

Lesson 32: Animation - Part III

32.1 Animation using Timer

All preceding examples of animation that you have learn in lesson 23 and lesson 24 only involve manual animation, which means you need to keep on clicking a certain command button or pressing a key to make an object animate. In order to make it move automatically, you need to use a timer. The first step in creating automatic animation is to drag the timer from the toolbox into the form and set its interval to a certain value other than 0. A value of 1 is 1 milliseconds which means a value of 1000 represents 1 second. The value of the timer interval will determine the speed on an animation.
In the following example, I use a very simple technique to show animation by using the properties Visible=False and Visible=true to show and hide two images alternately. When you click on the program, you should see the following animation.


The Code

Private Sub Timer1_Timer()
If Image1.Visible = True Then
Image1.Visible = False
Image2.Visible = True
ElseIf Image2.Visible = True Then
Image2.Visible = False
Image1.Visible = True
End If
End Sub

http://www.vbtutor.net/vb6/vbtutor.html
»»  READMORE...

Tuesday, November 29, 2011

Lesson 31: Animation - Part II

Drag and drop is a common windows application where you can drag and drop an object such as a file into a folder or into a recycle bin. This capability can be easily programmed in visual basic. In the following example, I am creating a simulation of dragging the objects into a recycle bin, then drop a fire and burn them away. 
 
In this program, I put 6 images on the form, one of them is a recycle bin, another is a burning recycle bin , one more is the fire, and three more images. In addition, set  the property dragmode of all the images( including the fire) that are to be dragged to  1(Automatic) so that dragging is enabled, and set the visible property of  burning recycle bin to false at start-up. Besides, label the tag of fire as fire in its properties windows. If you want to have better dragging effects, you need to load an appropriate icon under the dragIcon properties for those images to be dragged, preferably the icon should be the same as the image so that when you drag the image, it is like you are dragging the image along.
The essential event procedure  in this program is as follows:

Private sub 
Image4_DragDrop(Source
As Control, X As Single, Y As Single)

 Source.Visible = False
 If Source.Tag = "Fire" 
Then
Image4.Picture = Image5.Picture

 End If

 End Sub

Source refer to the image to be dragged. Using the code Source.Visible=False means it will disappear after being dragged into the recycle bin(Image4).If  the source is Fire, then the recycle bin will changed into a burning recycle bin , which is accomplished by using the code  Image4.Picture = Image5.Picture, where Image 5 is the burning recycle bin.
For details of this program, please refer to my game and fun programming page or click this link, Recycle Bin.
 

http://www.vbtutor.net/vb6/vbtutor.html
»»  READMORE...

Monday, November 28, 2011

Lesson 30 : Animation-Part I

Animation is always an interesting and exciting part of programming. Although visual basic is not designed to handle advance animations, you can still create some interesting animated effects if you put  in some hard thinking. There are many ways to create animated effects in VB6, but for a start we will focus on some easy methods.
The simplest way to create animation is to set the VISIBLE property of a group of images or pictures or texts and labels to true or false by triggering a set of events such as clicking a button. Let's examine the following example:
This is a program that create the illusion of moving the jet plane in four directions, North, South ,East, West. In order to do this, insert five images of the same picture into the form. Set the visible property of the image in the center to be true while the rest set to false. On start-up, a user will only be able to see the image in the center. Next, insert four command buttons into the form and change the labels to Move North, Move East, Move West and Move South respectively. Double click on the move north button and key in the following procedure:
Sub Command1_click( )
Image1.Visible = False
Image3.Visible = True
Image2.Visible = False
Image4.Visible = False
Image5.Visible = False
End Sub
By clicking on the move north button, only image 3 is displayed. This will give an illusion that the jet plane has moved north. Key in similar procedures by double clicking other command buttons. You can also insert an addition command button and label it as Reset and key in the following codes:
Image1.Visible = True
Image3.Visible = False
Image2.Visible = False
Image4.Visible = False
Image5.Visible = False
Clicking on the reset button will make the image in the center visible again while other images become invisible, this will give the false impression that the jet plane has move back to the original position. 


You can also issue the commands using a textbox, this idea actually came from my son Liew
You can also issue the commands using a textbox, this idea actually came from my son Liew Xun (10 years old). His program is shown below:
Private Sub Command1_Click()

If Text1.Text = "n" Then
Image1.Visible = False
Image3.Visible = True
Image2.Visible = False
Image4.Visible = False
Image5.Visible = False

ElseIf Text1.Text = "e" Then
Image1.Visible = False
Image4.Visible = True
Image2.Visible = False
Image3.Visible = False
Image5.Visible = False

ElseIf Text1.Text = "w" Then
Image1.Visible = False
Image3.Visible = False
Image2.Visible = False
Image4.Visible = False
Image5.Visible = True

ElseIf Text1.Text = "s" Then
Image1.Visible = False
Image3.Visible = False
Image2.Visible = True
Image4.Visible = False
Image5.Visible = False
End If

End Sub


Another simple way to simulate animation in VB6 is by using the Left and Top properties of an object. Image.Left give the distance of the image in twips from the left border of the screen, and Image.Top give the distance of the image in twips from the top border of the screen, where 1 twip is equivalent to 1/1440 inch. Using a statement such as Image.Left-100 will move the image 100 twips to the left, Image.Left+100 will move the image 100 twip away from the left(or 100 twips to the right), Image.Top-100 will move the image 100 twips to the top and Image.Top+100 will move the image 100 twips away from the top border (or 100 twips down).Below is a program that can move an object up, down. left, and right every time you click on a relevant command button.
 
The Code

Private Sub Command1_Click()
Image1.Top = Image1.Top + 100
End Sub

Private Sub Command2_Click()
Image1.Top = Image1.Top - 100
End Sub

Private Sub Command3_Click()
Image1.Left = Image1.Left + 100
End Sub

Private Sub Command4_Click()
Image1.Left = Image1.Left - 100
End Sub
 

The fourth example let user magnify and diminish an object by changing the height and width properties of an object. It is quite similar to the previous example. The statements  Image1.Height = Image1.Height + 100  and Image1.Width = Image1.Width + 100 will increase the height and the width of an object by 100 twips each time a user click on the relevant command button. On the other hand, The statements  Image1.Height = Image1.Height - 100  and Image1.Width = Image1.Width -100 will decrease the height and the width of an object by 100 twips each time a user click on the relevant command button

The Code
Private Sub Command1_Click()
Image1.Height = Image1.Height + 100
Image1.Width = Image1.Width + 100
End Sub

Private Sub Command2_Click()

Image1.Height = Image1.Height - 100
Image1.Width = Image1.Width - 100

End Sub
You can try to combine both programs above and make an object move and increases or decreases in size each time a user click a command button.

http://www.vbtutor.net/vb6/vbtutor.html
»»  READMORE...

Saturday, November 26, 2011

Lesson 29: Creating Advanced VB database application using ADO control

In previous lessons, you have learned how to design database applications using data control and ADO control. However, those applications are very simple and plain . In this lesson, you will learn how to create a more advanced database application using ADO control. The application you are going to create is known as an electronic library. This electronic library will be able to accept the user registration as well as handling login command that require the user's  password, thus enhancing the security aspect of the database. Basically, the application will constitute a welcome menu, a registration menu, a Login menu and the main database menu. The sequence of the menus are illustrated as follow:
2.1 The Welcome Menu
First of all, you need to design the Welcome menu. You can follow the example as follow:


In this form, you need to insert three command buttons and set their properties as follow:


Form name main_menu
command button 1  Name cmdRegister
command button 1 Caption Register
command button 2 Name cmdLogin
command button 2 Caption Login
command button 3 Name cmdCancel
command button 3 Caption Cancel

The code is as follows:

Private Sub cmdCancel_Click()
End
End Sub

Private Sub cmdLogin_Click()
main_menu.Hide
Login_form.Show
End Sub

Private Sub cmdRegister_Click()
main_menu.Hide
Register.Show
End Sub


29.2 The Registration Form
If a new user click the Register button, the registration form will appear. 
An example is illustrated as follow:


This registration forms consist of two text boxes , three command buttons and an ADO control. Their properties are set as follow:
Form name Register
textbox 1 name txtName
textbox 2 name txtpassword
textbox 2 PasswordChar *
command button 1 name cmdConfirm
command button 1 Caption Confirm
command button 2 name cmdClear
command button 2 Caption Clear
command button 3 name cmdCancel
command button 3 Caption Cancel
ADO control name UserInfo

note that the PasswordChar of textbox 2 is set as * which means users will not be able to see the actual characters they enter, they will only see the * symbol.
The codes are as follow:

Private Sub cancel_Click( )
End
End Sub

Private Sub cmdClear_Click( )
txtName.Text = ""
txtpassword.Text = ""

End Sub

Private Sub cmdConfirm_Click()

UserInfo.Recordset.Fields("username") = txtName.Text
UserInfo.Recordset.Fields("password") = txtpassword.Text
UserInfo.Recordset.Update

Register.Hide

Login_form.Show

End Sub


Private Sub Form_Load()
UserInfo.Recordset.AddNew
End Sub

29.3 The Login Menu
The Login menu is illustrated as follow:


There are two text boxes and a command button,  their properties are set as follow:
Textbox 1 name txtName
Textbox 2 name txtpassword
Command button 1 name cmdLogin
Command button 1 Caption Login
Form name Login_form


The codes are as follow:
Private Sub cmdLogin_Click()

Dim usrname As String
Dim psword As String
Dim usernam As String
Dim pssword As String
Dim Msg As String


Register.UserInfo.Refresh
usrname = txtName.Text
psword = txtpassword.Text


Do Until Register.UserInfo.Recordset.EOF
If Register.UserInfo.Recordset.Fields("username").Value = usrname And Register.UserInfo.Recordset.Fields("password").Value = psword Then
Login_form.Hide
frmLibrary.Show
Exit Sub

Else
Register.UserInfo.Recordset.MoveNext
End If

Loop

Msg = MsgBox("Invalid password, try again!", vbOKCancel)
If (Msg = 1) Then
Login_form.Show
txtName.Text = ""
txtpassword = ""

Else
End
End If


End Sub


29.4 The Main Database Manager
The main database manager is illustrated as follow:


The properties of all controls are listed in the table below:


Form name frmLibrary
ADO control name adoLibrary
ADO visible False
TextBox 1 name txtTitleA
TextBox 2 name txtAuthor
TextBox 3name txtPublisher
TextBox 4 name txtYear
TextBox 5 name txtCategory
Command button 1 name cmdSave
Command button 1 caption &Save
Command button 2 name cmdNew
Command button 2 caption &New
Command button 3 name cmdDelete
Command button 3 caption &Delete
Command button 4 name cmdCancel
Command button 4 caption &Cancel
Command button 5 name cmdNext
Command button 5 caption N&ext
Command button 6 name cmdPrevious
Command button 6 caption &Previous
Command button 7 name cmdExit
Command button 7 caption E&xit


The codes are as follow:


Private Sub cmdCancel_Click()
txtTitle.Text = ""
txtAuthor.Text = ""
txtPublisher.Text = ""
txtYear.Text = ""
txtCategory.Text = ""
End Sub

Private Sub cmdDelete_Click()
Confirm = MsgBox("Are you sure you want to delete this record?", vbYesNo, "Deletion Confirmation")
If Confirm = vbYes Then
adoLibrary.Recordset.Delete
MsgBox "Record Deleted!", , "Message"
Else
MsgBox "Record Not Deleted!", , "Message"
End If

End Sub

Private Sub cmdExit_Click()
End
End Sub

Private Sub cmdNew_Click()
adoLibrary.Recordset.AddNew

End Sub

Private Sub cmdNext_Click()
If Not adoLibrary.Recordset.EOF Then
adoLibrary.Recordset.MoveNext
If adoLibrary.Recordset.EOF Then
adoLibrary.Recordset.MovePrevious
End If
End If
End Sub

Private Sub cmdPrevious_Click()
If Not adoLibrary.Recordset.BOF Then
adoLibrary.Recordset.MovePrevious
If adoLibrary.Recordset.BOF Then
adoLibrary.Recordset.MoveNext
End If
End If
End Sub

Private Sub cmdSave_Click()

adoLibrary.Recordset.Fields("Title").Value = txtTitle.Text
adoLibrary.Recordset.Fields("Author").Value = txtAuthor.Text
adoLibrary.Recordset.Update

End Sub
 http://www.vbtutor.net/vb6/vbtutor.html
»»  READMORE...

Friday, November 25, 2011

Lesson 28: More SQL Keywords

In the previous chapter, we have learned to use the basic SQL keywords SELECT and FROM to manipulate database in Visual Basic 6 environment. In this lesson, you will learn to use more SQL keywords. One of the more important SQL keywords is WHERE. This keyword allow the user to search for data that fulfill certain criteria. The Syntax is as follows:

ELECT fieldname1,fieldname2,.....,fieldnameN  FROM  TableName WHERE  Criteria
 
The criteria can be specified using operators such as =, >,<, <=, >=, <> and Like.
Using the database books.mdb created in the previous chapter, we will show you a few examples. First of all,  start a new project and insert a DataGrid control and an ADO control into the form. . At the ADODC property pages dialog box, click on the Recordsource tab and select 1-adCmdText  under command type and under Command Text(SQL) key in SELECT * FROM book. Next, insert one textbox and put it on top of the DataGrid control, this will be the place where the user can enter SQL query text. Insert one command button and change the caption to Query. The design interface is shown below:


Example 21d1: Query based on Author
Run the program and key in the following SQL query statement
SELECT Title, Author FROM book WHERE Author='Liew Voon Kiong'
Where you click on the query button, the DataGrid will display the author name Liew Voon Kiong. as shown below:

Example 21d2:Query based on year
Run the program and key in the following SQL query statement:
SELECT * FROM book WHERE Year>2005
Where you click on the query button, the DataGrid will display all the books that were published after the year 2005.

You can also try following queries:
  • SELECT * FROM book WHERE Price<=80
  • SELECT * FROM book WHERE Year=2008
  • SELECT * FROM book WHERE Author<>'Liew Voon Kiong'
You may also search for data that contain certain characters by pattern matching. It involves using the Like operator and the % symbol. For example, if you want to search for a author name that begins with alphabet J, you can use the following query statement
SELECT * FROM book WHERE Author Like 'J%'
Where you click on the query command button, the records where authors' name start with the alphabet J will be displayed, as shown below:
Next, if you wish to rank order the data, either in ascending or descending order, you can use the ORDER By , ASC (for ascending) and DESC(Descending) SQL keywords.
The general formats are
                                SELECT fieldname1, fieldname2.....FROM table ORDER BY fieldname ASC
                                 SELECT fieldname1, fieldname2.....FROM table ORDER BY fieldname DESC

Example 21d3:
The following query statement will rank the records according to Author in ascending order.
                        SELECT Title, Author FROM book ORDER BY Author  ASC

Example 21d4
The following query statement will rank the records according to price in descending order.
SELECT Title, Price  FROM book ORDER BY Price  DESC

 http://www.vbtutor.net/vb6/vbtutor.html
»»  READMORE...

Wednesday, November 23, 2011

Lesson 27: Using SQL queries in Visual Basic 6

In the previous chapter, we have learned to use the DataGrid Control to display data from a database in Visual Basic 6 environment. However, it does not allow users to search for and select the information they want to see. In order to search for a certain information, we need to use SQL query. SQL stands for Structures Query Language. Using SQL keywords, we are able to select specific information to be displayed based on certain criteria. The most basic SQL keyword is SELECT, it is used together with the keyword FROM to select information from one or more tables from a database. The syntax is:
                                             SELECT fieldname1,fieldname2,.....,fieldnameN  FROM  TableName
fieldname1, fieldname2,......fieldnameN are headings of the columns from a table of a database. You can select any number of fieldname in the query. If you wish to select all the information, you can use the following syntax:
                                         SELECT  * FROM  TableName
In order to illustrate the usage of SQL queries, lets create a new database in Microsoft Access with the following filenames ID, Title, Author, Year, ISBN, Publisher, Price and save the table as book and the database as books.mdb in a designated folder.

Next, we will start Visual Basic and insert an ADO control, a DataGrid and three command buttons. Name the three command buttons as cmdAuthor, cmdTitle and cmdAll. Change their captions to Display Author ,Display Book Title and Display All respectively. You can also change the caption of the form to My Books. The design interface is shown below:


 Now you need to connect the database to the ADO data control. Please refer to lesson 25 for the details. However, you need to make one change. At the ADODC property pages dialog box, click on the Recordsource tab and select 1-adCmdText  under command type and under Command Text(SQL) key in SELECT * FROM book.


Next, click on the command buttton cmdAuthor and key in the following statements:
Private Sub cmdAuthor_Click()
Adodc1.RecordSource = "SELECT Author FROM book"
Adodc1.Refresh
Adodc1.Caption = Adodc1.RecordSource

End Sub

and for the command button cmdTitle, key in
Private Sub cmdTitle_Click()
Adodc1.RecordSource = "SELECT Title FROM book"
Adodc1.Refresh
Adodc1.Caption = Adodc1.RecordSource

End Sub

Finally for the command button cmdAll, key in
Private Sub cmdAll_Click()
Adodc1.RecordSource = "SELECT * FROM book"
Adodc1.Refresh
Adodc1.Caption = Adodc1.RecordSource


End Sub

Now, run the program and when you click on the Display Author button, only the names of authors will be displayed, as shown below:


and when you click on the Display Book Title button, ony the book titles will be displayed, as show below:


Lastly, click on the Display All button and all the information will be displayed.


http://www.vbtutor.net/vb6/vbtutor.html
»»  READMORE...

Tuesday, November 22, 2011

Lesson 26: Using Microsoft DataGrid Control 6.0

In the previous chapter, we use textboxes to display data by connecting them to a database via Microsoft ADO data Control 6.0. The textbox is not the only control that can display data from a database, many other controls in Visual Basic can display data. One of the them is the DataGrid control. DataGrid control can be used to display the entire table of a recordset of a database. It allows users to view and edit the data.
DataGrid control is the not the default item in the Visual Basic control toolbox, you have add it from the VB6 components. To add the DataGrid control, click on the project in the menu bar and select components where a dialog box that displays all the available VB6 components. Select Microsoft DataGrid Control 6.0 by clicking the checkbox beside this item. Before you exit the dialog box, you also need to select the Microsoft ADO data control so that you are able to access the database. Lastly, click on the OK button to exit the dialog box. Now you should be able to see that the DataGrid control and the ADO data control are added to the toolbox. The next step is to drag the DataGrid control and the ADO data control into the form.
The components dialog box is shown below:


Before you proceed , you need to create a database file using Microsoft Access. Here I created a file to store my the information of my books and I name the table book. After you have created the table, enter a few records such as mine. The table is shown below:
 Now you need to connect the database to the ADO data control. To do that, right click on the ADO data control and select the ADODC properties, the following dialog box will appear.


Next click on the Build button and the Data Link Properties dialog box will appear (as shown below). In this dialog box, select the database file you have created, in my case, the file name is books.mdb. Press test connection to see whether the connection is successful. If the connection is successful, click OK to return to the ADODC property pages dialog box. At the ADODC property pages dialog box, click on the Recordsource tab and select 2-adCmdTable under command type and select book as the table name, then click OK.
 
Finally you need to display the data in the DataGrid control. To accomplish this, go to the properties window and set the DataSource property of the DataGrid to Adodc1. You can also permit the user to add and edit your records by setting the AllowUpdate property to True. If you set this property to false, the user cannot edit the records. Now run the program and the output window is shown below:
http://www.vbtutor.net/vb6/vbtutor.html

»»  READMORE...

Lesson 25: Creating VB database applications using ADO control

n Lesson 22 and Lesson 23, we have learned how to build VB database applications using data control. However, data control is not a very flexible tool as it could only work  with limited kinds of data and must work strictly in the Visual Basic environment.
 To overcome these limitations, we can use a much more powerful data control in Visual Basic,  known as  ADO control. ADO stands for ActiveX data objects. As ADO is ActiveX-based, it can work in different platforms (different computer systems) and different programming languages. Besides, it can access many different kinds of data such as data displayed in the Internet browsers, email text and even graphics other than the usual relational and non relational database information.
To be able to use ADO data control, you need to insert it into the toolbox. To do this, simply press Ctrl+T to open the components dialog box and select Microsoft ActiveX Data Control 6. After this, you can proceed to build your ADO-based VB database applications.

The following example will illustrate how to build a relatively powerful database application using ADO data control. First of all, name the new  form as frmBookTitle and change its caption to Book Titles- ADO Application.  Secondly, insert the ADO data control and name it as adoBooks and change its caption to book. Next, insert the necessary labels, text boxes and command buttons. The runtime interface of this program is shown in the diagram below, it allows adding and deletion as well as updating and browsing of data
To be able to access and manage a database, you need to connect the ADO data control to a database file. We are going to use BIBLIO.MDB that comes with VB6. To connect ADO to this database file , follow the steps below:
a) Click on the ADO control on the form and open up the properties window.
b) Click on the ConnectionString property, the following dialog box will appear.


when the dialog box appear, select the Use Connection String's Option. Next, click build and at the Data Link dialog box, double-Click the option labeled Microsoft Jet 3.51 OLE DB provider


 After that, click the Next button to select the file BIBLO.MDB. You can click on Text Connection to ensure proper connection of the database file. Click OK to finish the connection.
Finally, click on the RecordSource property and set the command type to adCmd Table and Table name to Titles. Now you are ready to use the database file.


Now, you need to write code for all the command buttons. After which, you can make the ADO control invisible.

For the Save button, the program codes are as follow:
Private Sub cmdSave_Click()
adoBooks.Recordset.Fields("Title") = txtTitle.Text
adoBooks.Recordset.Fields("Year Published") = txtPub.Text
adoBooks.Recordset.Fields("ISBN") = txtISBN.Text
adoBooks.Recordset.Fields("PubID") = txtPubID.Text
adoBooks.Recordset.Fields("Subject") = txtSubject.Text
adoBooks.Recordset.Update

End Sub
For the Add button, the program codes are as follow:
Private Sub cmdAdd_Click()
adoBooks.Recordset.AddNew
End Sub
For the Delete button, the program codes are as follow:
Private Sub cmdDelete_Click()
Confirm = MsgBox("Are you sure you want to delete this record?", vbYesNo, "Deletion Confirmation")
If Confirm = vbYes Then
adoBooks.Recordset.Delete
MsgBox "Record Deleted!", , "Message"
Else
MsgBox "Record Not Deleted!", , "Message"
End If

End Sub

For the Cancel button, the program codes are as follow:
Private Sub cmdCancel_Click()
txtTitle.Text = ""
txtPub.Text = ""
txtPubID.Text = ""
txtISBN.Text = ""
txtSubject.Text = ""

End Sub
For the Previous (<) button, the program codes are
Private Sub cmdPrev_Click()

If Not adoBooks.Recordset.BOF Then
adoBooks.Recordset.MovePrevious
If adoBooks.Recordset.BOF Then
adoBooks.Recordset.MoveNext
End If
End If


End Sub

For the Next(>) button, the program codes are

Private Sub cmdNext_Click()

If Not adoBooks.Recordset.EOF Then
adoBooks.Recordset.MoveNext
If adoBooks.Recordset.EOF Then
adoBooks.Recordset.MovePrevious
End If
End If

End Sub
 http://www.vbtutor.net/vb6/vbtutor.html

»»  READMORE...

Monday, November 21, 2011

Lesson 24: Creating database applications in VB-Part II

In Lesson 23, you have learned how to create a simple database application using data control. In this lesson, you will work on the same application but use some slightly more advance commands. The data control support some methods that are useful in manipulating the database, for example, to move the pointer to a certain location. The following are some of the commands that you can use to move the pointer around:
data_navigator.RecordSet.MoveFirst                       ' Move to the first record
data_navigator.RecordSet.MoveLast                       ' Move to the last record
data_navigator.RecordSet.MoveNext                      ' Move to the next record
data_navigator.RecordSet.Previous                        ' Move to the first record

You can also add, save and delete records using the following commands:
data_navigator.RecordSet.AddNew                          ' Adds a new record
data_navigator.RecordSet.Update                           ' Updates and saves the new record
data_navigator.RecordSet.Delete                            ' Deletes a current record
*note: data_navigator is the name of data control
In the following example, you shall insert four commands and label them as First Record, Next Record, Previous Record and Last Record . They will be used to navigator around the database without using the data control. You still need to retain the same data control (from example in lesson 19) but set the property Visible to no so that users will not see the data control but use the button to browse through the database instead. Now, double-click  on the command button and key in the codes according to the labels.
Private Sub Command2_Click()
dtaBooks.Recordset.MoveFirst
End Sub


Private Sub Command1_Click()                     
dtaBooks.Recordset.MoveNext     
End Sub


Private Sub Command3_Click()
dtaBooks.Recordset.MovePrevious
End Sub

Private Sub Command4_Click()
dtaBooks.Recordset.MoveLast
End Sub

Run the application and you shall obtain the interface below and you will be able to browse the database using the four command buttons.

http://www.vbtutor.net/vb6/vbtutor.html
»»  READMORE...

Sunday, November 20, 2011

Lesson 23: Creating database applications in VB-Part I

Visual basic allows us to manage databases created with different database programs such as MS Access, Dbase, Paradox and etc. In this lesson, we are not dealing with how to create database files but we will see how we can access database files in the VB environment. In the following example, we will create a simple database application which enable one to browse customers' names.  To create this application,  insert the data control into the new form. Place the data control somewhere at the bottom of the form. Name the data control as data_navigator. To be able to use the data control, we need to connect it to any database. We can create a database file using any database application but I suggest we use the database files that come with VB6. Let select NWIND.MDB as our database file.

To connect the data control to this database, double-click the DatabaseName property in the properties window and select the above file, i.e NWIND.MDB.  Next, double-click on the RecordSource property to select the customers table from the database. You can also change the caption of the data control to anything but I use "Click to browse Customers" here. After that, we will place a label  and change its caption to Customer Name. Last but not least, insert another label and name it as cus_name and leave the label empty as customers' names will appear here when we click the arrows on the data control. We need to bind this label to the data control for the application to work. To do this, open the label's DataSource and select data_navigator that will appear automatically. One more thing that we need to do is to bind the label to the correct field so that data in this field will appear on this label. To do this, open the DataField property and select ContactName. Now, press F5 and run the program. You should be able to browse all the customers' names by clicking the arrows on the data control.

The Design  Interface.

The Runtime Interface

You can also add other fields using exactly the same method. For example, you can add adress, City and telephone number to the database browser


http://www.vbtutor.net/vb6/vbtutor.html
 
»»  READMORE...

Lesson 22: Creating Multimedia Applications-Part IV: A Multimedia Player

In lesson 20, we have created an audio player. Now, by making more modifications, you can transform the audio player into a multimedia player. This player will be able to search for all 
types of movie files and audio files in your drives and play them. 

In this project, you need to insert a ComboBox, a DriveListBox, a DirListBox, a TextBox ,a FileListBox  and a picture box (for playing movie) into your form. I Shall briefly discuss the function of each of the above controls. Besides, you must also insert Microsoft Multimedia Control(MMControl) into your form , you may make it visible or invisible. In my program, I choose to make it invisible so that I could use the command buttons created to control the player.

  • ComboBox- to display and enable selection of different type of files.
  • DriveListBox- to allow selection selection of different drives available on your PC.
  • DirListBox - To display directories
  • TextBox - To display selected files
  • FileListBox- To display files that are available

Relevant codes must be written to coordinate all the above controls so 
that the application can work properly. The program should flow in the 
following logical way:

Step 1: User chooses the type of files he wants to play.
Step2:User selects the drive that might contains the relevant audio files.
Step 3:User looks into directories and subdirectories for the files specified in step1. The files should be displayed in the  FileListBox.
Step 4:  User selects the files from the FileListBox and clicks the Play button.
Step 5: User clicks on the Stop button to stop playing and Exit button to end the application.


The Interface
The Code


Private Sub Form_Load()
'To fix the player size
Left = (Screen.Width - Width) \ 2
Top = (Screen.Height - Height) \ 2
Combo1.Text = "*.wav"
Combo1.AddItem "*.wav"
Combo1.AddItem "*.mid"
Combo1.AddItem "*.avi;*.mpg"
Combo1.AddItem "All files"

End Sub

Private Sub Combo1_Change()
        'To select types of media files
If ListIndex = 0 Then
File1.Pattern = ("*.wav")
ElseIf ListIndex = 1 Then
File1.Pattern = ("*.mid")
ElseIf ListIndex = 2 Then
File1.Pattern = ("*.avi;*.mpg")
Else
Fiel1.Pattern = ("*.*")
End If
End Sub
Private Sub Dir1_Change()
      'To search the directories or folders for the media files
File1.Path = Dir1.Path
If Combo1.ListIndex = 0 Then
File1.Pattern = ("*.wav")
ElseIf Combo1.ListIndex = 1 Then
File1.Pattern = ("*.mid")
ElseIf Combo1.ListIndex = 2 Then
File1.Pattern = ("*.avi;*.mpg")
Else
File1.Pattern = ("*.*")
End If
End Sub
Private Sub Drive1_Change()
'To Change Drives
Dir1.Path = Drive1.Drive
End Sub


Private Sub File1_Click()
'To load the selected file
If Combo1.ListIndex = 0 Then
File1.Pattern = ("*.wav")
ElseIf Combo1.ListIndex = 1 Then
File1.Pattern = ("*.mid")
ElseIf Combo1.ListIndex = 2 Then
File1.Pattern = ("*.avi;*.mpg")
Else
File1.Pattern = ("*.*")
End If

If Right(File1.Path, 1) <> "\" Then
filenam = File1.Path + "\" + File1.FileName
Else
filenam = File1.Path + File1.FileName
End If
Text1.Text = filenam
End Sub

Private Sub play_Click()
MMPlayer.FileName = Text1.Text
MMPlayer.Command = "Open"
MMPlayer.Command = "Play"
MMPlayer.hWndDisplay = videoscreen.hWnd
End Sub


Private Sub stop_Click()
If MMPlayer.Mode = 524 Then Exit Sub
If MMPlayer.Mode <> 525 Then
MMPlayer.Wait = True
MMPlayer.Command = "Stop"
End If
MMPlayer.Wait = True
MMPlayer.Command = "Close"
End Sub


http://www.vbtutor.net/vb6/vbtutor.html
»»  READMORE...

Saturday, November 19, 2011

Lesson 21: Creating Multimedia Applications-Part III

n lesson 20, we have created an audio player. Now, by making further modifications, you can transform the audio player into a picture viewer. This viewer will be created in such a way that it could search for all types of graphics files in  your drives and displays them in a picture frame.
Similar to the previous project, in this project, you need to insert a ComboBox, a DriveListBox, a DirListBox, a TextBox and a FileListBox into your form. I Shall briefly explain again the function of each of the above controls. 

  • ComboBox- to display and enable selection of different type of files.
  • DriveListBox- to allow selection of different drives available on your PC.
  • DirListBox - To display directories
  • TextBox - To display selected files
  • FileListBox- To display files that are available

Relevant code must be written to coordinate all the above controls so that the application can work properly. The program should flow in the following logical way:
Step 1: The user chooses the type of files he wants to play.
Step2:The user selects the drive that might contains the relevant graphic  files.
Step 3:The user looks into directories and subdirectories for the files specified in step1. The files should be displayed in the  FileListBox.
Step 4: The user selects the files from the FileListBox and click the Show button.
Step 5: The user clicks on  Exit button to end the application.

The Interface

The Code

Private Sub Form_Load()
'To center the player
Left = (Screen.Width - Width) \ 2
Top = (Screen.Height - Height)\2
                                                                       

Combo1.Text = "All graphic files"
Combo1.AddItem "All graphic files"
Combo1.AddItem "All files"

End Sub

Private Sub Combo1_Change()
If ListIndex = 0 Then
File1.Pattern = ("*.bmp;*.wmf;*.jpg;*.gif")
Else
Fiel1.Pattern = ("*.*")
End If

End Sub
'Specific the types of files to load
Private Sub Dir1_Change()

File1.Path = Dir1.Path
File1.Pattern = ("*.bmp;*.wmf;*.jpg;*.gif")

End Sub
'Changing Drives
Private Sub Drive1_Change()
Dir1.Path = Drive1.Drive
End Sub                       

Private Sub File1_Click()
If Combo1.ListIndex = 0 Then
File1.Pattern = ("*.bmp;*.wmf;*.jpg;*.gif")
Else
File1.Pattern = ("*.*")
EnId If

If Right(File1.Path, 1) <> "\" Then
filenam = File1.Path + "\" + File1.FileName
Else
filenam = File1.Path + File1.FileName
End If
Text1.Text = filenam

End Sub


Private Sub show_Click()

If Right(File1.Path, 1) <> "\" Then
filenam = File1.Path + "\" + File1.FileName
Else
filenam = File1.Path + File1.FileName
End If

'To load the picture into the picture box
picture1.Picture = LoadPicture(filenam)

End Sub

http://www.vbtutor.net/vb6/vbtutor.html
»»  READMORE...